1) Mark a document as Final (soft protection)
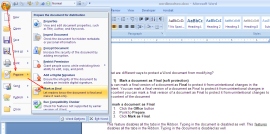
You can mark a final version of a document as Final to protect it from unintentional changes to the content.
To mark a document as Final
- Click the Office button
- Point to Prepare.
- Click Mark as Final.
This feature disables all the tabs in the Ribbon. Typing in the document is disabled as well.
Mark as Final is not a strong security feature to protect a document, as the restriction can be removed easily by clicking again on Mark as Final.
2) Make a document read-only (soft protection)
You can make a document read-only to prevent accidental modification of the content.
To make a document read-only
- Right-click the document. The Properties dialog box appears.
- In the dialog box, under the tab General, click the check box Read-only.
OR
You can double-click the document by holding the ALT key to the open the Properties dialog box.
Now, if you open the document, you can view Read-only marked along with the document name in the title bar. All the tabs in the Ribbon are disabled.
Again, this is not a strong security feature, as anyone can remove restrictions by deselecting the Read-only check box from the right-click menu.
3) Protect Document (strong protection)
The Protect Document feature available under the Developer tab enables you to hard protect a document.
To protect a document
- Under the tab Developer, within the group Protect, click Protect Document.
- From the drop-down menu, click Restrict Formatting and Editing. The Restrict Formatting and Editing task pane appears on the right hand side.
Note: In case, the Developer tab is not available in the Ribbon, you can enable it from Word Options. Click the Office button. From the bottom of the menu, click the Word Options button. The Word Options dialog box appears. Click Popular from the menu list on the left. On the right hand pane, click the check box Show Developer Tab in the Ribbon.
- Now in the Restrict Formatting and Editing task pane, under the section Editing Restriction, select the check box Allow only this type of editing in the document and the restriction type drop down gets enabled. Select the option No changes (Read only) option.
- Click the button Yes, Start Enforcing Protection. Start Enforcing Protection dialog box appears.
- Under the options Password, enter a new password to protect the document. One will have to provide this password to modify the document.
This does not ensure full proof protection as the document is not encrypted.
4) Encrypt a Document (full proof protection of a document)
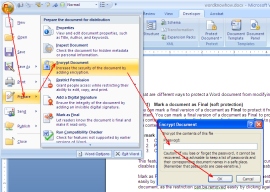
The Encrypt Document option provides full proof protection to a document.
To encrypt a document
- Click the Office button
- Point to Prepare in the drop-down list
- Click Encrypt Document. The encrypt document dialog box appears.
- Enter a password in the Password field. Click OK.
- Reenter the password. Click OK.
Remember the password, as there is no way to recover a document if you forget the password.


