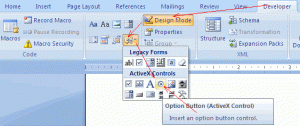
Radio button can be used in a Form to capture user’s feedback. Following is a simple example that shows the usage of a radio button also known as Option button.
- On the Word Ribbon, under the tab Developer, within the group Controls, click the Legacy Tools icon. A drop-down list appears.
- From the drop-down list, under the section ActiveX Controls, click the icon Option Button (ActiveX Control). Word creates something like the following.
- By default, the radio button appears in Design Mode. Click the Design Mode option available within group Controls to switch to normal mode, so that the radio button becomes clickable.
- To change the caption of the radio button,
- Click the radio button and then click Design Mode from the Controls group.
- Right-click the radio button and click option Properties from the right-click menu.
- On the Properties sheet, under the tab Alphabetic, look for the row with the heading Caption. On the adjacent cell of Caption, double-click to delete the default caption i.e. OptionButton 1 and enter a new caption. Alternatively, you can delete the default caption to retain only radio button. Later, you can resize the button by dragging the resize handles.
The next challenge is to group the radio buttons under different sections.
This is important for each group of buttons to behave independently. Otherwise, all the buttons in the document would behave as one group (by default) and only one feedback could be captured.
For example, in the above example form, each question contains two radio buttons (Yes/No) to capture feedback. Each pair of buttons must be grouped to capture feedback for individual question.
To group radio buttons
- Switch to design mode by selecting the radio button and then clicking the Design Mode option from within the group Controls.
- Once you are in Design Mode, right-click the radio button and select option Properties from the right-click menu. The Properties sheet appears.
- On the Properties sheet, under the tab Alphabetic, look for the row with the heading GroupName. Click the adjacent cell to enter a group name.
- Now you need to keep the same group name for the rest of the radio buttons, which you want to keep as one group. You are done.
Note: Before you share a document containing Radio button or any other controls, you should to protect your document to prevent editing of the document. To know how to protect a document, read the following articles:


The post was very helpful. Instructions are very clear and precise.
Thank you Neeju…means a lot
Helped me! Boy it’s tedious to group every set of radio buttons together though. I suppose you’ve got to change the properties for every single button!
I created a new document and saved it as a .docm made edits, and saved it as a .htm file. However, now my radial buttons are invisible on the new .htm file.
In addition, I started a new document, added radial buttons, grouped them as desired, saved as a .htm (web page), .mht (Single File Web Page), and .html (Web Page, Filtered). Same results as above, invisible radial buttons and captions.
What gives and how to I resolve it?
“Later, you can resize the button by dragging the resize handles.” No, I don’t think this is correct. But if it is, I’d love to know how. I’ve spent the past hour trying to resize the radio buttons and can’t figure it out.
It’s helpful. Thank you !
This is what I wanted… really helpful.. many thanks
Welcome!
Banana!!!!
After a bit of hunting I found this article which was just perfect.
It is for exactly my application and purpose. More or less.
And the instruction are clear. I did what the instructions said and it worked.
Thank you.
Really cool and helped me!