How to manage images in Word

If you are having a tough time managing images in your document, the following tips will surely help you.

Majority of the time, we want the images in the document to stick at a fixed position. Images that float are hard to manage.

To fix an image at a certain position in the document

  1. Click the image. The Picture Tools menu group is enabled in Word Ribbon.

in line with text

  1. On the Format tab under the menu Pictures Tools , within the group Arrange, click the drop-down list button Text Wrapping.
  2. Click In Line with Text from the drop-down list. The selected image will be fixed at a line in the document.
  3. You can click and drag the image to a different line in the document.
  4. To place the image at a different position horizontally, place the mouse cursor in front of the image and then use Tab or Space Bar to move the  image horizontally to a new position.

To wrap text around an image

  1. Select the image.
  2. On the Format tab under Pictures Tools menu, within the group Arrange, click the drop-down menu Text Wrapping .
  3. Select Square from the drop-down list. Text will be arranged around the image in the shape of a square.
  4. If image has an irregular shape (such as a star), click Tight from the drop-down list. Text takes the shape of the image around it.

Note:  If the image inserted has an irregular shape (such as a star), select the option Tight to arrange text around the shape.

How to add caption to a figure in Word and insert a new Label for a caption

To add a caption in Word

  1. From the Ribbon, click the tab References.
  2. On the References tab, within the menu group Captions, click Insert Caption (keyboard shortcut key: Alt+S+P). The dialog box Caption appears.
  3. Select a caption label from the drop-down list Label (default labels are Equation, Figure, and Table).
  4. Enter a caption next to the label in the Caption field.
  5. Click OK.

insert caption

To insert a new Label

  1. On the Caption dialog box, click the button New Label.
  2. Enter the new label name in the New Label pop-up window.
  3. Click OK. the New label is added to the drop-down list Label.

How to remove Header and Footer from part of a document

If you remove header/footer from a page of a Word doc, header/footer from the entire document disappears. Similarly, if you insert header/footer to a page, the same is copied to entire pages of the document. This is how header/footer supposed to work.

Now, if you need to apply unique header & footer to a page or part of a document other than the rest of the document, how will you do that?

The trick lies in separating the pages which would have unique header/footer from the rest of the document using Section Breaks. The separated sections can be applied with unique formatting and styling.

For example, suppose the pages 5 to 7 in your document to have a unique header/footer than the rest of the document.

The Procedure

  1. Insert Section Breaks at the end of the pages 4 and 7. This way, you have divided the document into three sections. To insert a Section Break, do the following:
  2. From the Word Ribbon, click the tab Page Layout and then click Breaks under the group Page Setup. From the drop-down list, click Next Page under Section Break. See below screen.

insert section break

  1. Now on the 5th page, enable the header/footer sections by double clicking the top/bottom of the page respectively. The Header & Footer Tools tab is enabled on the Word Ribbon.
  2. From the Header & Footer Tools tab, under the group Navigation, click the Link to Previous icon link to previous icon to de-link the current section from the previous section. This is the key step of the procedure.
  3. Now, enter new header/footer content on the 5th page.
  4. Similarly, enable the header/footer section on the 7th page and click the Link to Previous icon to disable the linking between current and previous sections. On this header/footer, you can repeat the header/footer of the first section.

Please go through the following article to understand how to remove header and from the first page:

https://wordknowhow.wordpress.com/2013/04/04/how-to-remove-header-and-footer-from-the-first-page-of-your-word-document/

How to remove header and footer from the first page of your Word document

This is super easy.

The Procedure

  1. Open your Word document.
  2. From the Ribbon, click the Page Layout tab.
  3. On the Page Layout tab, click the Page Setup dialog-box-launcher icon dialog box launcher. The Page Setup dialog box appears. See the screenshot below.

remove header and footer frist page

  1. From the Page Setup dialog box, click the Layout tab.
  2. On the Layout tab, under the section Headers and Footers, select the “Different first page” check box.
  3. Click OK. You are done.

Updating and Formatting Table of Contents

Updating Table of Contents

After creating a Table of Contents if you had made changes to the document and wish to update the Table of Contents accordingly, do the following:

  1.  Right-click on the Table of Contents
  2. From the right-click menu, click Update Field. Update Table of Contents dialog box appears.
  3. Select the option Update Entire Table
  4. Click OK.

See below image:

update table of content

Formatting Table of Contents

You can modify the appearance of a Table of Contents by formatting the text in the table of contents.

    1. View the default styles for each heading level in the Styles gallery. To open the Styles gallery widget, click Alt+O+S. See below image:

format table of cotents1

  1. Click the down arrow button next to a style in the gallery, click Modify. Modify Style dialog box appears.
  2. In the Modify Style dialog box, you can modify properties such as font, paragraph, tabs, border, for each heading level in the Table of Contents.

See below image:

format table of cotents2

How to create a Table of Content automatically in Word

Creating a table of content automatically in Word involves the following two steps:

Step 1:

1.    Identify the texts in your document that you intend to highlight as headings and then apply appropriate heading styles from the Styles gallery.

For example, to apply  first level heading, select the text in your document and then click style Heading 1 from the Styles gallery. See below:

table of content1

(To learn more on how to create and apply multilevel heading styles in your document, read the following post:

https://wordknowhow.wordpress.com/2013/01/30/how-to-use-multilevel-numbered-headings-in-the-word/)

Step 2:

Once you are done applying  heading styles to all the heading levels in your document, place the mouse cursor where you want to generate the table of content.

Click the Reference tab from the Ribbon and then under group Table of Contents, click the icon Table of Contents. From the bottom  of the drop-down list, click Insert Table of Contents See below image:

table of content2

On clicking Insert Table of Contents, the dialog box Table of Contents appears. Now, do the following in the dialog box:

  1. Select a Tab Leader type from the drop-down list.
  2. Select a format for the table of content from the drop-down list Formats.
  3. Select the number of heading levels to be included in the table of contents from the Show Levels spin box.
  4. Click the Options button from the right bottom corner to include/exclude heading styles to build a customized table of content.

See below image:

table of content3

Click OK. Table of Content is generated in the cursor position.

( To learn more about how to update and format a Table of Contents in Word read the following article:

https://wordknowhow.wordpress.com/2013/03/28/updating-and-formatting-table-of-contents/ )

How to create multilevel lists in Word

Creating and fixing multi-level numbered headings in Word might seem to be a bit tricky for the first time users. Nevertheless, if you know the correct procedure, it would be a piece of cake!

Note: If you’ve already created a list, but ran into a problem, read this to fix your list: https://wordknowhow.wordpress.com/2013/05/20/how-to-fix-multilevel-list-in-word/

Follow the steps stated below to create a new multilevel numbered list the correct way:

The Procedure

Firstly, we will define the multilevel numbering for the heading levels using Multilevel List feature.

1.     Open the Word document in which you want to apply numbered headings.

2.     From the Word Ribbon menu, under the tab Home and within the group Paragraph, click the Multilevel List icon multi list button .  A drop-down menu appears.

(Click the image to view in full screen)

define new multi level list

2.     From the drop-down menu, select the option Define New Multilevel List (at the bottom of the menu). The “Define New Multilevel List” dialog box pops up.

3.     Click the More button  (Picture1)  available at the bottom of the dialog box. The dialog box expands to show additional fields (see below image).

define new multi level list dialog
Create First Level Heading   (or define number format for the first level heading)

4.     Click level “1” from Click level to modify selection box (on the top left hand side of the dialog box).

5.     From the drop-down list named Link level to style, select “Heading 1”.  This way, you are linking heading level “1”  (that you will use in your document) to Word’s default Heading 1 style from the Styles gallery. Later, you can modify style for each heading as you wish.

6.     In this step, enter a numbering format for your heading level 1 in the field Enter formatting for number from the drop-drop-down list Number style for this level. So, the format you select from the drop-down list will appear in the Enter formatting for number field. You can delete the default number format appearing in the Enter formatting for number field and choose your own.

Important:
a.    You can reset the value in the Enter formatting for number field by selecting a value from the spin box Start at.
b.    If you find the field Number style for this level as disabled, clear the check box Legal style numbering.
Creating Second Level Heading

7.     Similarly, select level “2” from Click level to modify selection box.

8.     Link level 2 to Word’s default Heading 2 by selecting “Heading 2” from the Link level to style drop-down list.

9.     Delete whatever appears (by default) in the field Enter formatting for number to apply a new number format. From the field Include level number from, select Level 1 (as a prefix) for the second level heading. Apply a dot (.) or anything you would like after the prefix number. I prefer a dot.

10.     After a dot (.)select a numbering format for the Level 2 heading (e.g. 1.1). You are done.

11.     Similarly, you can keep adding levels as needed. While creating the third heading, select Level 1 and Level 2 headings as prefixes from the Include Level Number from field and then select a number format for the Level 3 heading (e.g. 1.1.1 ).

The following example shows how to construct the Heading level 4.

untitled
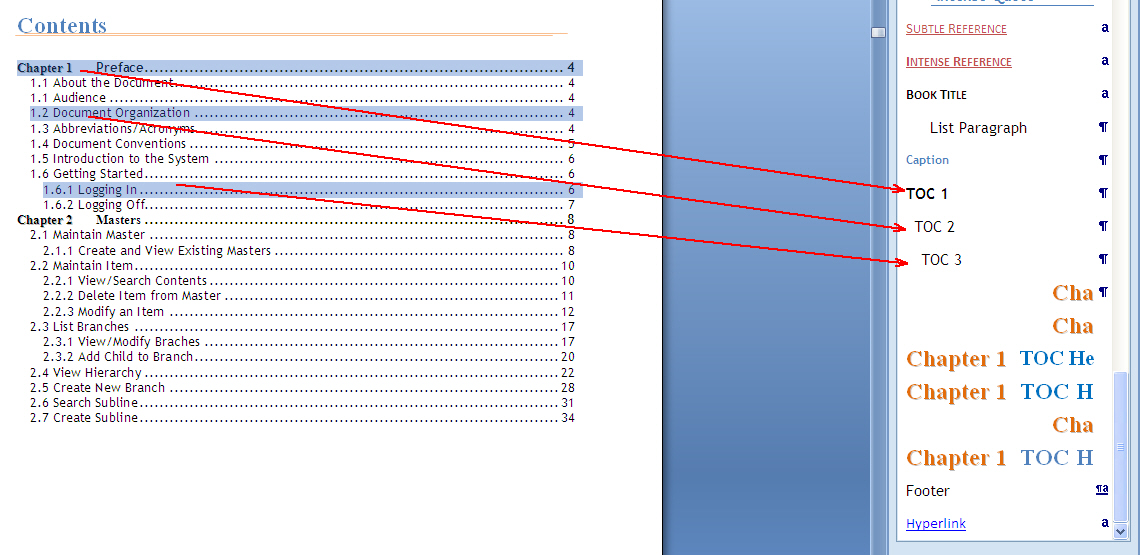
Once you are done with defining number format for all the headings, you can view the same being updated in the Styles gallery, under the tab Home, within the group Styles in the Ribbon. Or, you can open the Styles window by pressing Shift+Ctrl+Alt+S.

Now, select text in your document (which you want as a heading) and then click the relevant heading style (which you have just created) from the Styles gallery.

Please note that you may not see all the  multilevel heading levels (that you have just created) in the gallery depending on the configuration of the Style Pane Options. You can open the Style Pane Options dialog box by clicking the Options link available at the bottom of the Styles gallery pane. See below image.

untitled

The Style Pane Options window appears. Click Select styles to show drop-down list and select the option All Styles from the list. Click OK. Now you can view all the 9 heading levels with multilevel numbering in the Styles gallery.
Modify the appearance of the headings

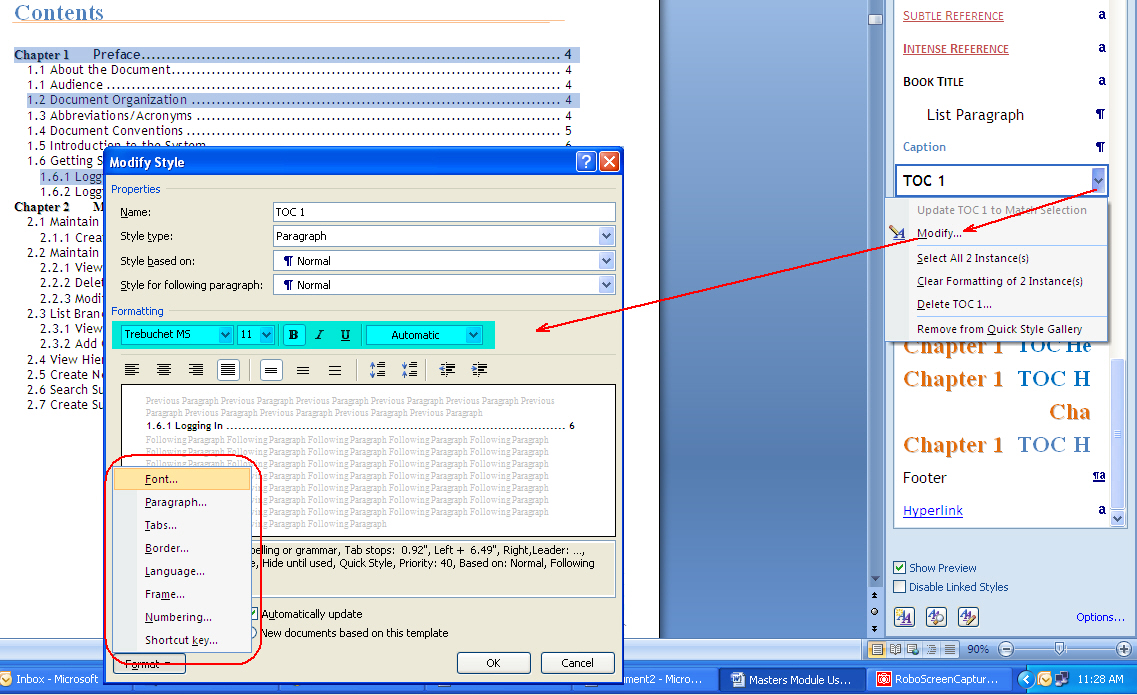
You can modify the style (font, numbering, etc.) of the headings from the styles gallery by selecting Modify from the right-click menu of each heading and then clicking the Untitled button from the Modify Style dialog box.

For example, if you want your Heading 1 to have font “Cambria”, font size “14”, Bold, color Blue then configure these in the Modify Style dialog box as shown in the following screenshot.

untitled

You can also apply these style by clicking the Format  button available at the bottom of the Modify Style dialog box and then clicking the Font from the sub-menu. This will display the Font dialog box where you can apply font styles for Heading 1.

Similarly, you can modify other properties of the headings by selecting the appropriate options from the Format sub-menu.

Please let me know in the comment section if you have any difficulty understanding the procedure or if you have any other queries, suggestions, etc. I will be more than happy to help you out! Thank you.

The following post could also be helpful to you:

https://wordknowhow.wordpress.com/2013/05/20/how-to-fix-multilevel-list-in-word/

AutoText Feature in MS Word 2007

AutoText almost anything (graphical elements, tables, etc.) that you can select in your Word document. This is one of the handy features for faster document processing.

THE PROCEDURE

To add an AutoText entry
a.  Select the Word element (text paragraph, tables, image, etc.) that you want to add to AutoText.
b.  Click Alt+F3 (Word 2003 shortcut key, it works). Create New Building Block dialog box appears.
c.   In the dialog box, enter a Name for the Word element.
d.  Select a Gallery type from the drop-down list where you want the Word element to appear. For example, if you are adding a custom table to AutoText, select the Gallery type as table. Later, you can access the  custom  table from Insert > Table > Quick Tables.

Note:
Alternatively, you can add the AutoText feature to your Quick Access Toolbar as shown below:

Picture3

To add AutoText to Quick Access Toolbar

a.  Click the Office button Picture1, click Word Options from the bottom of the menu list, and then click Customize from the Word Option dialog box.
b.  In the Customize window, select the entry All Commands from Choose commands from drop-down list.
c.  Select the command AutoText by scrolling down the All Commands list.
d.  Click the button  Picture4 to add the AutoText command to the Quick Access Toolbar list.

Picture2

Select a block of text that you want to save as AutoText entry.

Important:
After you have added an AutoText entry, Word alerts you to save the changes made to Building Blocks. If you do not save, AutoText entry would disappear next time you open Word.

AutoCorrect Feature in MS Word 2007

Word provides this excellent feature that saves you a great amount of manual work. You can store your frequently used text, paragraph, sentences, or any other text as AutoCorrect entry. Use the following procedure to add AutoCorrect entries.

THE PROCEDURE

To add an AutoCorrect entry
1. Select the text that you want to add as an AutoCorrect entry.
2. In Word 2007, press Alt+T+A (Word 2003 shortcut key). AutoCorrect dialog box appears.
OR,
Click the Office button, click Word Options, click Proofing, and finally click AutoCorrect Option button under the AutoCorrect options section. AutoCorrect window appears.

Picture1

3. Word fills the selected text in the With fields. Now, enter the text in the Replace field that would be replaced with the With text.
4. Click Add.

To use an AutoCorrect entry in your document
In the above example (see figure), we have added an AutoCorrect entry. Type auto and then press the Spacebar; ‘AutoCorrect’ will be replace ‘auto’.

How to Create Different Headers and Footers in the same Word Document

MS Word provides an option to create different headers and footers within the same document. Divide the document into different sections using Section break to achieve this. Then you can assign unique header and footer to each section.

Suppose your document has five chapters and you need to insert unique header and footer details to each section, the below procedure does exactly that.

THE PROCEDURE

Divide the document into five separate sections using Section breaks. See below to learn how to insert Section breaks at the end of each chapter to create separate page sections.

1. To insert a section break, on the Page Layout tab, within the group Page Setup, click the drop-down list Breaks.

2. From the Page Breaks drop-down, click Next Page. A section break is inserted at the cursor position.

Picture5

Tip: If you are unable to view the section breaks after applying them in your document, click ‘Ctrl+Shift+8’.

3.  Similarly, apply section breaks at the end for rest of the chapters as well.

4.  In this step, disconnect the Header/Footer section of the first chapter from the second chapter. To do so, double-click the Header or   Footer section (extreme bottom or top of the page) at the beginning of the second chapter. The Header & Footer Tools >> Design tab gets activated in the Ribbon.

5. Now on the Design tab, within the group Navigation, you can find the Link to Previous being highlighted. This implies that header/footer of the second chapter is linked to the first chapter.

Picture1

6.  Click Link to Previous to deactivate which  disconnect or de-link the second chapter from the first chapter.

7.  Repeat the above steps for the rest of the chapters. After disconnecting header/footer for all the chapters, you can insert unique header/footer content.

Tip: While header/footer is enabled, you can move from one section break to the next by clicking the Next Section button available within the group Navigation, under menu group Header & Footer Tools >> Design.